∴이글은 초심자용 글입니다.
목표.Nginx에 Tomcat 연동해보기!
●초보자도 편하게 따라올수있게 차근차근 친절히 알려주기
●nginx와 tomcat 연동해보기
안녕하세요 저번시간에는 nginx를 설치해봤습니다.
오늘은 nignx와 tomcat을 연동해보는 시간을 갖도록 하겠습니다.
nignx.conf에 설정을 변경해서 하는방식과
include 문을 이용해서 vhost 파일을 작성하는 방식 두가지가 있는데
두가지방법 다 기술하도록 하겠습니다.
본인 스타일에 맞는걸 이용하시면 될거같습니다.
1.nginx.conf 설정
2.vhost 작성 설정
1.nginx.conf
pwd
/home/hunhee/nginx/conf
#변경전 백업 필수
cp nginx.conf nginx.conf_20260106
vi nginx.conf
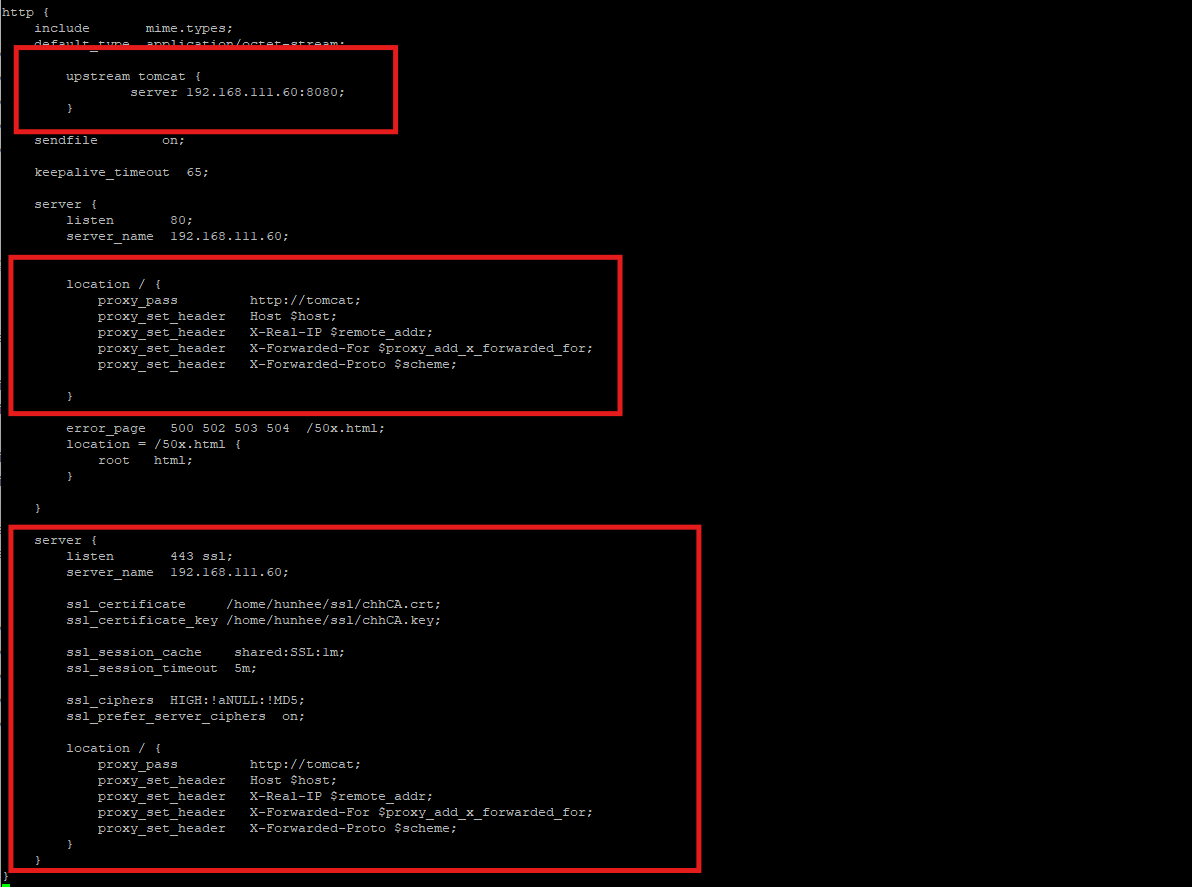
#http 설정에 tomcat 설정하기
http {
include mime.types;
default_type application/octet-stream;
###여기서부터 추가한내용###
upstream tomcat {
server 192.168.111.60:8080;
}
###추가작성 끝###
sendfile on;
keepalive_timeout 65;
#server 설정에 proxy_pass 잡아주기
server {
listen 80;
server_name 192.168.111.60;
location / {
proxy_pass http://tomcat;
proxy_set_header Host $host;
proxy_set_header X-Real-IP $remote_addr;
proxy_set_header X-Forwarded-For $proxy_add_x_forwarded_for;
proxy_set_header X-Forwarded-Proto $scheme;
}
}
#ssl 인증서 설정
server {
listen 443 ssl;
server_name 192.168.111.60;
ssl_certificate /home/hunhee/ssl/chhCA.crt;
ssl_certificate_key /home/hunhee/ssl/chhCA.key;
ssl_session_cache shared:SSL:1m;
ssl_session_timeout 5m;
ssl_ciphers HIGH:!aNULL:!MD5;
ssl_prefer_server_ciphers on;
location / {
proxy_pass http://tomcat;
proxy_set_header Host $host;
proxy_set_header X-Real-IP $remote_addr;
proxy_set_header X-Forwarded-For $proxy_add_x_forwarded_for;
proxy_set_header X-Forwarded-Proto $scheme;
}
}
}
*추가한 설정 내용
1.연동할 톰켓 주소와 포트 클라이언트 요청을 tomcat으로 전달
upstream tomcat {
server 192.168.111.60:8080;
}
2. url 주소 /app/ 으로 하면 호출시 http://ip:port/app/ 으로 호출함
location / {
proxy_pass http://tomcat;
proxy_set_header Host $host;
proxy_set_header X-Real-IP $remote_addr;
proxy_set_header X-Forwarded-For $proxy_add_x_forwarded_for;
proxy_set_header X-Forwarded-Proto $scheme;
}
#개발환경이니 proxy_pass, proxy_set_header Host $host; 2개만 설정해도 상관없습니다.
#proxy_pass : upstream에 지정한 이름
#proxy_set_header Host $host; : 원래 요청한 도메인 정보를 Tomcat에 전달
#proxy_set_header X-Real-IP $remote_addr; : 실제 클라이언트 IP를 전달
#proxy_set_header X-Forwarded-For $proxy_add_x_forwarded_for; : 프록시를 거쳐온 모든 클라이언트 IP 체인을 기록
#proxy_set_header X-Forwarded-Proto $scheme; : 클라이언트가 사용한 프로토콜 정보 전달
저는 가독성을 높이기 위해서 일단 주석처리된
문장들은 다 지워주고 작성했습니다.
주석처리된 부분들은 필요시에 백업파일에서 꺼내 보면되겠죠?
설정을 다해보고 파일검사를 해보겠습니다.
pwd
/home/hunhee/nginx/sbin

./nginx -t

nginx: the configuration file /home/hunhee/nginx/conf/nginx.conf syntax is ok
nginx: configuration file /home/hunhee/nginx/conf/nginx.conf test is successful
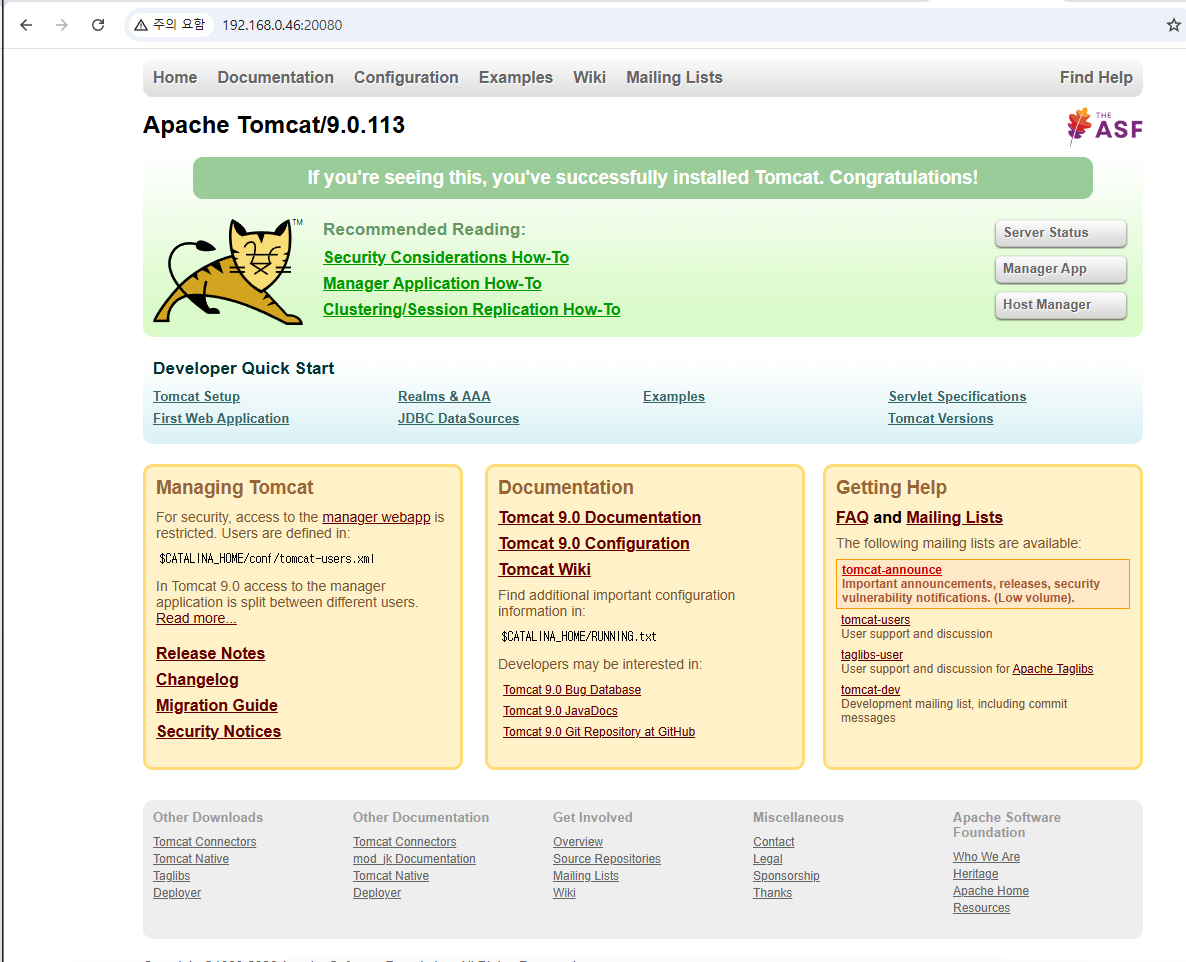
nginx 와 tomcat을 실행하고
연동이 되는지 확인해보겠습니다.
저는 가상머신이 원격컴퓨터에 있어서 설정한 주소가 다르게 보입니다
이건 나중에 기회가되면 포트포워딩을 기술할때 설명하겠습니다.

ip:80 포트로 호출하니 tomcat 웰컴페이지가 올라왔고
개발자도구로 살펴보니 nginx/1.29.4 버전으로 호출한걸 확인이 됐습니다.
다음은 vhost 문을 작성해서 설정해보겠습니다.
2.vhost 작성 설정
vhost 작성은 무엇이냐.. /home/hunhee/nginx/conf 에 vhost.conf 파일을 만들고nginx.conf 의 안의 내용을 vhost.conf에 넣고 include 문을 사용해서 넣어주는겁니다.말로 설명하면 어렵습니다 하면서 보시면 이해하기 편합니다.
pwd
/home/hunhee/nginx/conf

#1.nginx.conf 설정 백업후 초기상태로 변경
cp nginx.conf nginx.conf_20260106_2

cp nginx.conf_20260106 nginx.conf

# 원상태로 복구후 진행
#vhost.conf 의 네이밍은 그냥 제가 편한걸로 만든겁니다.
#여러분이 원하시는 이름으로 변경하셔도 상관없어요!


#server 문 구절을 전부 복사
vi vhost.conf
server {
        listen       80;
        server_name  192.168.111.60;


        location / {
            proxy_pass         http://tomcat;
            proxy_set_header   Host $host;
            proxy_set_header   X-Real-IP $remote_addr;
            proxy_set_header   X-Forwarded-For $proxy_add_x_forwarded_for;
            proxy_set_header   X-Forwarded-Proto $scheme;

        }

        error_page   500 502 503 504  /50x.html;
        location = /50x.html {
            root   html;
        }

}

server {
        listen       443 ssl;
        server_name  192.168.111.60;

        ssl_certificate     /home/hunhee/ssl/chhCA.crt;
        ssl_certificate_key /home/hunhee/ssl/chhCA.key;

        ssl_session_cache    shared:SSL:1m;
        ssl_session_timeout  5m;

        ssl_ciphers  HIGH:!aNULL:!MD5;
        ssl_prefer_server_ciphers  on;

        location / {
            proxy_pass         http://tomcat;
            proxy_set_header   Host $host;
            proxy_set_header   X-Real-IP $remote_addr;
            proxy_set_header   X-Forwarded-For $proxy_add_x_forwarded_for;
            proxy_set_header   X-Forwarded-Proto $scheme;
        }
}

#저장후 종료
wq!
vhost.conf에 server 구절을 다 넣어줬습니다.
이제 ngixn.conf에 include 문을 넣어서 이 내용을 읽으라는 명령을 내릴겁니다.
pwd
/home/hunhee/nginx/conf

vi nginx.conf

user  hunhee;
worker_processes  1;

events {
    worker_connections  1024;
}


http {
    include       mime.types;
    default_type  application/octet-stream;

    upstream tomcat {
      server 192.168.111.60:8080;
    }

    sendfile        on;
    keepalive_timeout  65;

    include /home/hunhee/nginx/conf/vhost.conf;

}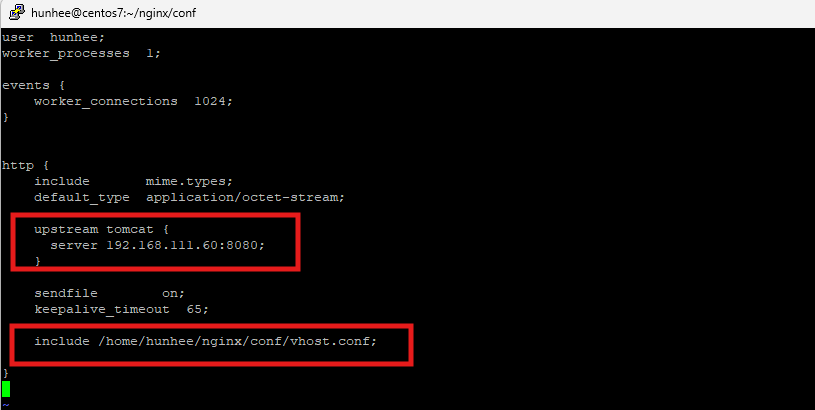
자 이렇게
upstream tomcat
include /home/hunhee/nginx/conf/vhost.conf;
두가지 설정만 하면 끝입니다.
nginx.conf 설정이 저게 다입니다.
server 구절을 다 지워서 다음페이지로 안넘겨도 한눈에 들어오죠?
1. nginx.conf 설정 방식은 60줄 넘게 있었는데
2. vhost.conf 작성 방식은 23줄안에 끝나네요
이제 연동됐는지 재시작후 테스트 해보겠습니다.
잘나오네요!
vhost.conf 작성 방식은
가독성이 좋아지는 방식이지만 관리해야할 파일이 한개가 늘었습니다.
여러분들은 각자의 스타일 대로 원하는 방식으로 설정하면 되겠죠?
다음시간에는 무엇을할지 고민해보고 포스팅하도록 하겠습니다.
감사합니다!
'WEB,WAS 및 기술' 카테고리의 다른 글
| [WEB/WAS] Tomcat session clustering 톰켓 세션클러스터링! (5) | 2026.01.08 |
|---|---|
| [WEB/WAS] apache + tomcat 여러개의 톰켓 연동 처리 (0) | 2026.01.07 |
| [WEB/WAS] 리눅스에 Nginx 를 설치해보자! (0) | 2026.01.05 |
| [WEB/WAS] Tomcat 엔진 하나로 컨테이너 2개 만들기 (0) | 2025.12.31 |
| [WEB/WAS] Tomcat jvm option, 힙메모리 , java option (0) | 2025.12.30 |