nginx_upstream_check_module 설치해보기
nginx_upstream_check_module 이란 nginx를
사용중에 헬스체크와 성능을 볼수있는 오픈소스입니다.
nignx 일반설치 + nginx_upstream_check_module 설치를 진행해보겠습니다.
nginx 일반설치와 설치파일 다운로드 방법은 아래링크 참조 하시면될거같습니다.
2026.01.05 - [WEB,WAS] - [WEB/WAS] 리눅스에 Nginx 를 설치해보자!
[WEB/WAS] 리눅스에 Nginx 를 설치해보자!
∴이글은 초심자용 글입니다. 목표. Nginx 를 설치해보자!●초보자도 편하게 따라올수있게 차근차근 친절히 알려주기●Nginx 를 리눅스에 소스 컴파일로 설치해보자 안녕하세요 오늘은 Nginx 엔진
hunhee44.tistory.com
순서
1. 필수패키지 설치
2. nginx 파일들 압축해제
3. nginx_upstream_check_module 설치
4. 컴파일
5. nginx.conf 설정
6. 확인
1.필수패키지 설치
yum -y groupinstall "Development Tools"
yum -y install pcre pcre-devel zlib zlib-devel openssl openssl-devel
yum -y install gcc gcc-c++ make
os 설치시 풀패키지로 받으셨거나 패키지가 있으시면 넘어가셔도됩니다.
2. nginx 설치파일들 준비 및 압축해제
위의 nginx 설치 링크에서 nginx 파일들을 다운로드하고
git clone https://github.com/yaoweibin/nginx_upstream_check_module.git
git clone 으로 직접 서버에 다운로드하시거나
깃 허브에 오픈소스를 직접 다운로드해서 업로드 하시면됩니다.
https://github.com/yaoweibin/nginx_upstream_check_module.git
GitHub - yaoweibin/nginx_upstream_check_module: Health checks upstreams for nginx
Health checks upstreams for nginx. Contribute to yaoweibin/nginx_upstream_check_module development by creating an account on GitHub.
github.com
다운로드 및 업로드가 끝나셨으면 압축해제 하고 다음단계로 넘어가시면 됩니다.

3. nginx_upstream_check_module 설치
pwd
/home/hunhee/install_files/nginx_install_files_upstream/nginx-1.29.4

#압축해제한 nginx-1.29.4 로 이동후에 패치 진행
patch -p1 < ../nginx_upstream_check_module/check_1.20.1+.patch
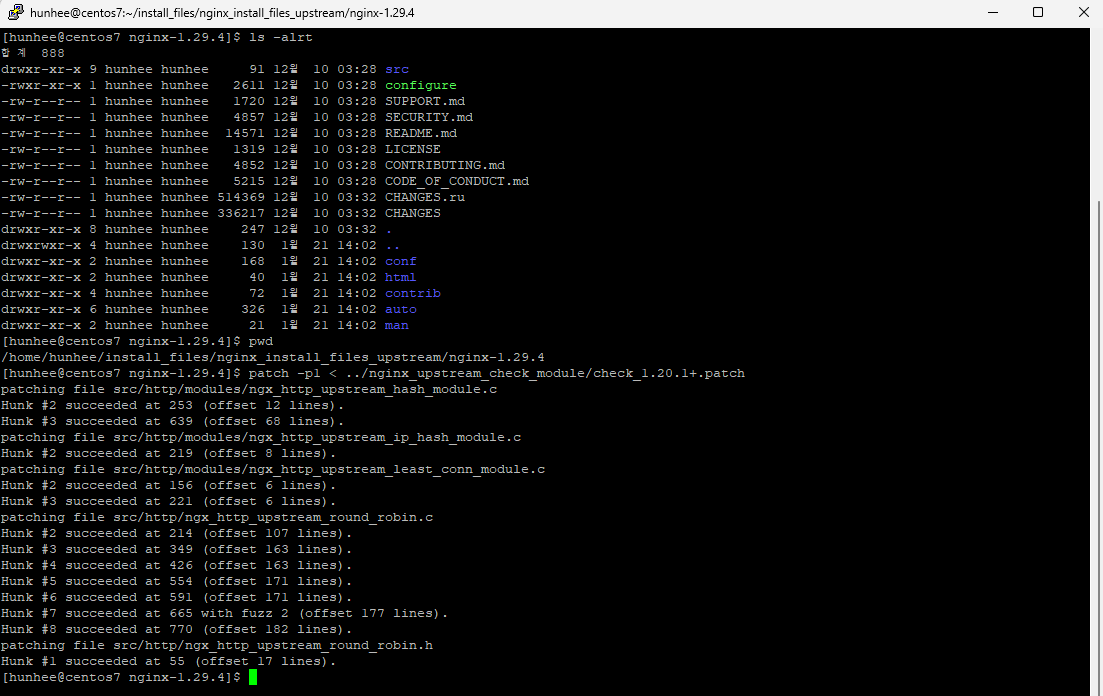
패치까지 진행하셨다면 이젠 nginx 설치가 진행됩니다.
4. 컴파일
pwd
/home/hunhee/install_files/nginx_install_files_upstream/nginx-1.29.4
./configure --prefix=/home/hunhee/nginx --with-http_ssl_module --with-http_gzip_static_module --add-module=../nginx_upstream_check_module

#openssl 을 따로 설치하신분은 openssl 경로 잡아주기
./configure --prefix=/home/hunhee/nginx --with-http_ssl_module --with-http_gzip_static_module --add-module=../nginx_upstream_check_module --with-openssl=openssl 설치경로


make

make install
컴파일 까지 진행하면 --prefix= 경로에 설정해준 nginx 디렉토리가 생성됩니다.
설치가 완료됐습니다.
5. nginx.conf 설정
pwd
/home/hunhee/nginx/conf

#변경전 백업
cp nginx.conf nginx.conf_20260121

vi nginx.conf

#맨윗줄 user 설치 계정으로 변경
user  hunhee;

http{
   #tomcat 연동설정
    upstream tomcat_backend {
        server 192.168.111.60:8080;

        #nginx_upstream_check_module 설정
        check interval=3000 rise=2 fall=5 timeout=4000 type=http;
        check_http_send "HEAD / HTTP/1.0\r\n\r\n";
        check_http_expect_alive http_2xx http_3xx;

   }

   #server url 설정
   server{

  	   #tomcat 연동설정
    	location / {
            proxy_pass   http://tomcat_backend;
            proxy_set_header   Host $host;
            proxy_set_header   X-Real-IP $remote_addr;
            proxy_set_header   X-Forwarded-For $proxy_add_x_forwarded_for;
            proxy_set_header   X-Forwarded-Proto $scheme;

    	}


		location /status {
			 check_status;
		}
    }
}


#저장후 종료
:wq!
tocmat 연동설정을 자세하게 보고싶으시면 아래링크 클릭
2026.01.06 - [WEB,WAS] - [WEB/WAS] Nginx Tomcat을 연동해보자!
[WEB/WAS] Nginx Tomcat을 연동해보자!
∴이글은 초심자용 글입니다. 목표.Nginx에 Tomcat 연동해보기!●초보자도 편하게 따라올수있게 차근차근 친절히 알려주기●nginx와 tomcat 연동해보기 안녕하세요 저번시간에는 nginx를 설치해봤습니
hunhee44.tistory.com
6. 확인
이제 nginx 를 실행해보자
pwd
/home/hunhee/nginx/sbin

./nginx
했더니

0.0.0.0:80 퍼미션 에러가 나온다.
root 계정이 아닌 일반계정으로 80 포트를 사용하려고 해서 그렇습니다.
당황하지말고 소유자를 root로 변경해주고 시스템 실행권환을 줍시다.
#root 계정으로 변경

pwd
/home/hunhee/nginx/sbin

[root@centos7 sbin]# chown root:root nginx
[root@centos7 sbin]# chmod +s nginx
변경 후에 이번엔 무결성검사를 진행하니 이상없다고 나옵니다.

nginx를 실행해주고 ip:port 를 브라우저에 쳐봤더니
연동한 tomcat 페이지가 나오고 있습니다.

이제 저희가 설치한 헬스체크 모듈 /status 를 붙여서 호출해보겠습니다.

저희가 설치한 nginx_upstream_check_module 모듈이
정상적으로 작동하고있습니다.
tomcat_backend 항목이 상태가 up 으로 기동되어 있습니다.
tomcat을 기동 중지시키고 다시 확인해보겠습니다.

tomcat 을 기동중지후에 다시 호출해보니 fall counts 가 올라가고
fall count가 5이상이되면 비정상으로 간주해서 down 상태로 변경이 됩니다.
아래 캡쳐화면처럼요!

status가 down 으로 변경되고 이것은 tomcat이 죽었다고 판단할수 있습니다.
위에 nginx_upstream_check_module 설정에서
check interval=3000 rise=2 fall=5 timeout=4000 type=http;
check_http_send "HEAD / HTTP/1.0\r\n\r\n";
check_http_expect_alive http_2xx http_3xx;
3초 간격으로 rise 카운트를 체크하고 fall=5 가
되면죽었다고 판단을 저희가 설정을 했습니다.
자기가 운영하는서버의 적절한 시간을 배분해주면 되겠죠?
끝입니다.
'WEB,WAS 및 기술' 카테고리의 다른 글
| Tomcat Thread pool 설정 및 확인 방법 (0) | 2026.01.26 |
|---|---|
| tomcat context path 잡기 및 apache 분기처리 (0) | 2026.01.23 |
| [WEB/WAS] Tomcat 장애시 제일먼저 확인 하는것 (0) | 2026.01.20 |
| 리눅스 SCP, SFTP 명령어 사용법 (0) | 2026.01.19 |
| [WEB/WAS] Apache ssl 인증서 비밀번호 자동입력 (0) | 2026.01.16 |